


What are PRDs and how to create them?
A practical guide to create your first PRD as a product manager

👋🏻 Hey there, welcome to the #24th edition of the Product Space Newsletter, where we help you become better at product management.
A PRD is a comprehensive document that outlines the purpose, features, functionality, and behavior of a product or feature. It is used by the entire product team, ensuring everyone is aligned on what needs to be built and why.
As a PM, understanding how to create and utilize PRDs effectively is essential. In this guide will walk you through everything you need to know about PRDs, from their basic components to best practices for creating them.

Understanding PRDs
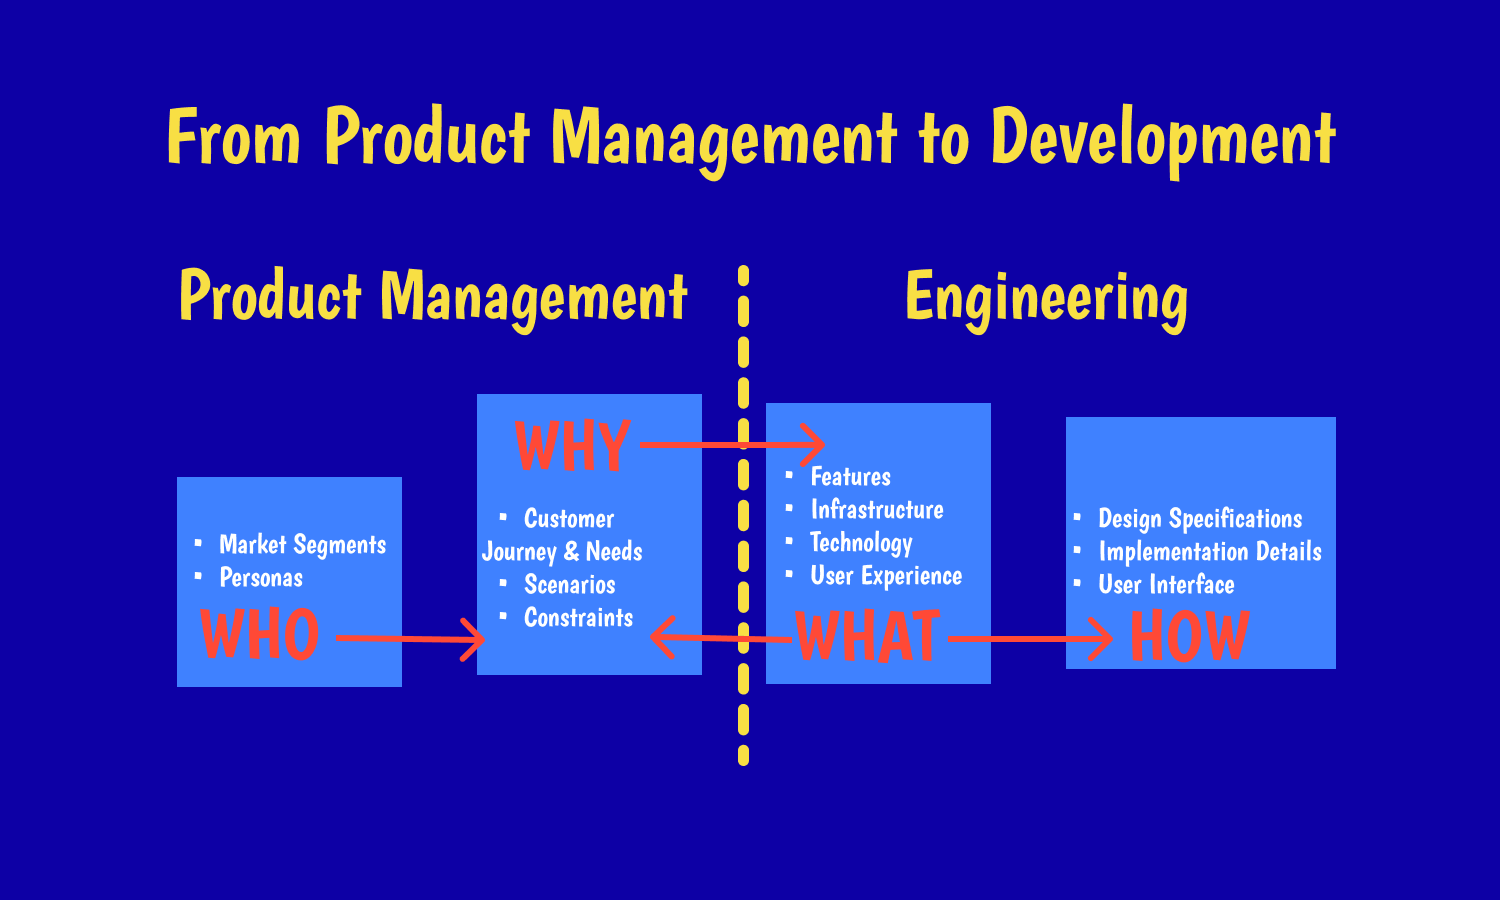
The primary purpose of a PRD is to articulate the product vision, set clear expectations, and provide a roadmap for the development team throughout the product development process. It answers the fundamental questions:
What is the product?
Who is it for?
Why is it being developed?
How will it function?
How PRDs Differ from Other Product Documents
It's important to understand how PRDs fit into the broader ecosystem of product documentation:
Market Requirements Document (MRD): Focuses on market needs and opportunities. The PRD builds upon this, detailing how the product will address these needs.
Product Spec: Often more technical and detailed than a PRD, focusing on how the product will be built.
User Stories: While often included in a PRD, user stories alone are typically less comprehensive and lack the broader context provided by a full PRD.
When to Write a PRD
Stages of Product Development Where PRDs are Most Useful
PRDs are typically most valuable in the following stages:
Ideation and Conceptualization: When a new product or feature is being considered, a PRD helps solidify the concept.
Planning: Before development begins, a PRD ensures all requirements are captured and prioritized.
Development: During development, the PRD serves as a reference point for the team.
Testing: QA teams use the PRD to ensure the product meets the specified requirements.
Scenarios that Call for a PRD
New Product Development: When creating an entirely new product.
Major Feature Additions: For significant new features in an existing product.
Product Redesigns: When overhauling or significantly updating an existing product.
Integration Projects: When integrating new technologies or systems into an existing product.
How PRDs Fit into Agile Methodologies
While PRDs are often associated with waterfall methodologies, they can be adapted for agile environments:
In agile, PRDs should be viewed as living documents that evolve with the product.
Focus on capturing the high-level vision and key requirements, leaving room for flexibility in implementation.
PRDs should be updated after each sprint or major milestone to reflect the current state of the product.
Use the PRD as a collaborative tool during sprint planning and backlog refinement.
Key Components of a PRD
While the exact structure may vary depending on your organization and the specific product, most PRDs include the following key components:
1. Product Overview
This section sets the stage for the entire PRD. It should be concise yet comprehensive enough to give readers a clear understanding of what the product or feature is about.
Brief description: In 2-3 sentences, explain what the product or feature does. For example, "Our new mobile app allows users to track their daily water intake and receive personalized hydration recommendations."
Problem it solves: Clearly articulate the user pain point or market gap this product addresses. For instance, "Many people struggle to stay adequately hydrated throughout the day, which can lead to decreased productivity and health issues."
Value proposition: Explain how your product solves this problem better than existing solutions. "By providing easy tracking and personalized reminders, our app makes staying hydrated effortless and engaging."
High-level goals: List 3-5 primary objectives for the product. These should be broad yet specific to your product vision. For example:
Increase daily water intake for users
Promote healthier lifestyle habits
Provide data-driven insights on hydration patterns
2. Objectives and Goals
This section dives deeper into the specific, measurable objectives for the product.
Use the SMART framework (Specific, Measurable, Achievable, Relevant, Time-bound) to define objectives. For example, "Achieve 100,000 active daily users within 6 months of launch."
Explain how these objectives support broader company goals. "By promoting healthy habits, this app aligns with our company mission to improve global health and wellness."
List the key results or expected outcomes that will indicate success. For instance:
50% of users report increased daily water intake after 1 month of use
30% reduction in reported headaches and fatigue among active users
4.5+ star rating on app stores within 3 months of launch
3. Target Audience and User Personas
Understanding your users is critical for building a product that meets their needs.
Provide a broad overview of who your product is for. "Our primary target audience is health-conscious individuals aged 25-45 who own smartphones and are interested in improving their daily habits."
Go into specifics about your users. For example:
Demographics: Primarily urban dwellers, 60% female, 40% male
Behaviors: Regular gym-goers, use fitness tracking apps
Needs: Easy way to track water intake, motivation to stay hydrated
Pain points: Forget to drink water regularly, unsure of optimal hydration levels
User personas: Create 2-3 detailed personas that represent your key user types. Each persona should include:
Name and photo (can be fictional)
Demographics (age, occupation, location)
Goals and motivations
Frustrations and challenges
Typical day in their life
How your product fits into their routine
For example: "Sara, 32, Marketing Manager in New Delhi
- Goal: Stay hydrated to maintain energy levels throughout busy workdays
- Frustration: Often forgets to drink water when caught up in meetings
- Our app: Sends gentle reminders and tracks Sarah's intake, helping her stay on top of her hydration goals"
4. User Stories and Use Cases
This section bridges the gap between user needs and product features.
User stories: Follow the format "As a [user type], I want to [action] so that [benefit]". For example:
"As a busy professional, I want to receive hydration reminders so that I don't forget to drink water throughout the day."
"As a fitness enthusiast, I want to set custom hydration goals so that I can adjust my intake based on my activity level."
Use cases: Describe specific scenarios of how users will interact with your product. For instance:
"Use Case: Tracking Daily Water IntakeUser opens the app in the morning
User sees their hydration goal for the day
Throughout the day, user logs water intake by tapping '+' button
App sends reminder if user is behind on their goal
At the end of the day, app provides a summary of user's hydration achievements"
5. Functional Requirements
This section details what the product should do.
Enumerate all features the product should have. For example:
User registration and profile creation
Daily hydration goal setting
Water intake logging
Reminders and notifications
Progress tracking and visualizations
Integration with other health apps
Provide a brief explanation of how each feature should work. For instance:
"Reminders and notifications: The app will send push notifications to remind users to drink water. The frequency and timing of these reminders will be customizable by the user."
Prioritize features into must-haves, should-haves, and nice-to-haves. This helps in planning development phases.
6. Non-Functional Requirements
These requirements define the quality attributes of the system.
Performance: Specify expected response times, load capacity, etc. "The app should load within 2 seconds and handle up to 1 million concurrent users."
Scalability: Describe how the system should handle growth. "The backend should be able to scale horizontally to accommodate user growth of up to 50% month-over-month."
Security and privacy: Outline security measures and data handling practices. "User data must be encrypted at rest and in transit. The app should comply with GDPR and CCPA regulations."
Accessibility: Specify accessibility standards to be met. "The app should be compliant with WCAG 2.1 Level AA standards."
Compatibility: List supported devices, operating systems, and browsers. "The app should be compatible with iOS 13+ and Android 8+."
7. User Interface and User Experience Specifications
This section provides guidance for the design team.
Wireframes or mockups: Include rough sketches or detailed mockups of key screens. These visuals help communicate the layout and functionality of the app.
User flow diagrams: Create flowcharts showing how users will navigate through the app. This helps identify all necessary screens and interactions.
Design guidelines: Specify any design principles or brand guidelines to be followed. "The app should use a blue color palette to reinforce the theme of water and hydration. The interface should be clean and minimalist to ensure ease of use."
8. Technical Specifications
This section provides technical details for the development team.
Technology stack: Specify the programming languages, frameworks, and tools to be used. "The app will be developed using React Native for cross-platform compatibility. The backend will use Node.js with a MongoDB database."
APIs and integrations: List any external services or APIs the app will use. "The app will integrate with Apple Health and Google Fit for additional health data."
Data models: Describe the structure of your database or any complex data relationships. "The app will use a NoSQL database with collections for Users, Water intake, and Goals."
Algorithms or complex logic: Explain any sophisticated calculations or logic the app will perform. "The app will use a machine learning model to predict optimal hydration levels based on user activity and environmental factors."
9. Dependencies and Constraints
Identify factors that could impact development or performance.
External dependencies: List any third-party services or libraries the app relies on. "The app requires access to the device's push notification system."
Technical limitations: Mention any known technical challenges or limitations. "The accuracy of water intake tracking is limited by manual user input."
Business or regulatory constraints: Highlight any legal or business rules that must be followed. "The app must comply with health data privacy regulations in all operating regions."
10. Timeline and Milestones
Provide a high-level project schedule.
Project timeline: Give an overview of the expected development duration. "The project is expected to take 4 months from kickoff to launch."
Key milestones: List important project phases or deliverables. For example:
Month 1: Design and prototyping complete
Month 2: Core features developed
Month 3: Beta testing
Month 4: Public launch
Phased rollout plan: If applicable, describe how the product will be gradually released. "We will do a soft launch in one geographic region before expanding globally."
11. Success Metrics and KPIs
Define how you'll measure the success of the product.
Clearly state what success looks like for this product. "Success is achieving 100,000 daily active users who report improved hydration habits within 6 months of launch."
List the key metrics you'll track. For example:
Daily Active Users (DAU)
User retention rate
Average daily water intake per user
App store rating
Measurement methods: Explain how you'll collect and analyze these metrics. "We will use in-app analytics to track user engagement and retention. We'll also conduct monthly user surveys to gather qualitative feedback on the app's impact on hydration habits."
Step-by-Step Guide to Writing a PRD
1. Gathering Information and Conducting Research
This initial step is crucial for building a solid foundation for your PRD. It involves collecting all necessary information to make informed decisions about your product.
Clearly articulate the user need your product will address and research the competitive landscape, market size, and growth potential.
Gather qualitative data through user interviews and quantitative data through surveys. Observe users interacting with your product (if applicable) to identify pain points. Analyze existing customer feedback to understand their needs and expectations.
Create a feature comparison matrix to evaluate your product's strengths and weaknesses relative to competitors. Analyze their user experience and pricing strategies to understand market trends.
Collaborate with sales, customer support, marketing, and engineering teams to gain insights into customer needs, pain points, and technical feasibility.
Stay updated on industry reports, technological advancements, and regulatory requirements to ensure your product aligns with market trends and legal considerations.
2. Defining the Product Vision and Objectives
This step involves synthesizing the information gathered to create a clear direction for your product.
Clearly articulate the core problem your product addresses, its impact on users, and the market opportunity.
Create a compelling vision statement that outlines the desired future state for your product, its unique features, and long-term goals.
Set SMART objectives - specific, measurable, achievable, relevant, and time-bound goals aligned with your product vision and overall business objectives.
3. Identifying and Prioritizing Features
This step involves determining what features your product will have and in what order they should be developed.
Brainstorm with your team, analyze user stories, and conduct competitive analysis to identify potential features.
Use frameworks like MoSCoW, RICE, or Kano to prioritize features based on their importance, impact, and feasibility and make sure they directly contribute to your product's goals and address user needs.
Use impact mapping and user journey mapping to verify that the selected features support critical user experiences to ensure stakeholder buy-in.
4. Writing Clear and Concise Requirements
This step involves documenting the details of each feature in a way that's easy for all stakeholders to understand.
Use simple, unambiguous language. Avoid jargon and write in a way that is easy to understand for all stakeholders.
Be specific and quantifiable. Use numbers and specific measurements instead of vague terms. Provide examples and define specialized terms.
Include acceptance criteria. Clearly define what conditions must be met for a feature to be considered complete, using scenarios and edge cases.
Use consistent formatting and structure. You can employ a template, numbering system, and visual aids to ensure clarity and organization.
5. Collaborating with Stakeholders
This step ensures that all relevant parties are involved in the PRD creation process, leading to a more comprehensive and widely-accepted document.
Involve cross-functional teams. Conduct workshops and gather input from designers, developers, sales, marketing, and customer support to ensure a comprehensive and aligned PRD.
Gather feedback and iterate. Conduct structured review sessions, use feedback collection tools, and be prepared to revise the PRD based on input from stakeholders.
Ensure stakeholder alignment. Work closely with all relevant parties to ensure that the PRD is widely accepted and supports overall business objectives.
6. Iterating and Refining the PRD
This final step is about ensuring the PRD remains a living document that accurately reflects the current state and direction of the product.
Regularly review and update the PRD based on new information and feedback, using a change log and version control.
Manage scope by removing or deprioritizing features that no longer align with core objectives, and communicate changes to stakeholders.
Cross-reference PRD sections and update dependencies to maintain the document's consistency and accuracy.
Before major releases or milestones, conduct a comprehensive review of the entire PRD to ensure it accurately reflects the product's current state and direction.
PRD Templates and Tools
There are several PRD templates available online that can help streamline the document creation process. Popular options include templates from
Google Docs Template: Simple, customizable, and easy to share and collaborate on.
Atlassian Confluence Template: Offers a structured format with built-in collaboration features.
Product Plan Template: Provides a visual template that integrates with roadmapping features.
Recommended Tools for Creating and Managing PRDs
Confluence: Great for collaborative document creation and management.
Notion: Offers flexible templates and database features for requirement tracking.
Aha!: Provides comprehensive product management features, including PRD creation.
ProductBoard: Helps connect customer feedback to product requirements.
Jira: While primarily for project management, it can be used to track and manage product requirements.
Tips for Customizing Templates to Fit Your Needs
Start with a basic template and adapt it to your specific product and organizational needs.
Include sections that are relevant to your product and development process.
Use consistent formatting and structure across all your PRDs for easier navigation and understanding.
Incorporate your company's branding and terminology to make the document feel more native to your organization.
Create different versions of your template for different types of projects (e.g., new products, feature updates, integrations).
Remember, the best PRD is one that effectively communicates your product vision and requirements to your team. Don't be afraid to iterate on your PRD format as you learn what works best for your organization.
That’s a wrap for today!
Do you have any question or a handy tip to share about PRDs? We’d love to hear from you!
Share in the comments below or reply to this email.
Until next time, keep innovating, keep iterating, and above all, keep being awesome.
Cheers!
Product Space
Do you have any script we could use as starting point ?
Thanks for the guide
Thanks for sharing. I’ll read up on PRDs.
https://theericcoyleventure.substack.com/